Tuesday, February 28, 2012

Excess --OR-- Online Shopping, Thou Art Satan

I was terribly excited to receive the following books this week:


Once they arrived, I spent about an hour leafing through them, reading bits and pieces and perusing the photos.

And then I thought to myself, "Did I really just buy books about how to date fabric?  Fabric Dating? REALLY?" Good Grief.

I don't collect feedsacks or vintage fabrics, I certainly can't afford to collect vintage quilts. Honestly, I don't know what came over me other than a whim to pick these up. I'm working on a 30's repro quilt, but I can buy those prints at my local quilt shop. I've since rationalized that they might come in handy to my husband's antique mall booth---he may pick up some vintage quilts that need dating at some point. And actually, the Making History book is quite a fascinating read and does include several projects, so I don't feel as bad about buying that one. Who knows, perhaps the other two will prove invaluable some day.

As I was putting the books away, I realized that I am completely overrun with quilting, sewing, and craft project books. To the point that it's ridiculous. If I live a hundred years, I'll never complete all those projects. The thought of the money that's gone into those dust collectors is sad.

So I've made a decision.

I will not buy another project book. Not one. Until I finish a minimum of at least five different projects from five different books. And those that I don't use and don't think I ever will use...I'm going to donate to my local library. Goodness knows they don't have an abundance of craft books. I could furnish the entire 646 section!

And then there's fabric. Don't even get me started!! All I'll say right now is that it looks like JoAnn Fabrics threw up in my sewing room. Here's the decision on fabric for now...

 No more QUILTING fabric(unless it is for backings). If I can't use what I have to make a quilt, I just won't make one!

I feel pretty confident I can stick to both of these new rules. I'm gonna try to stay away from Amazon.com, Etsy.com and the like for as long as possible!

Monday, January 16, 2012

Weight Watchers, It Works and Now I've Got to Work It!

I joined Weight Watchers for the umpteenth time back in August. It's the only thing I've ever found that I can do and consistently lose weight.

I'm losing much more slowly this time around, but I've been OK with the slow loss. Slow loss is better than NO loss, right?

The thing is, I haven't worked the plan wholeheartedly.  I do GREAT for a couple weeks, but I have been known to slack off for weeks at a time.  Still, I'm mostly satisfied with my progress.

And even though 15 pounds(which is where I'm hovering right now) doesn't sound like much, when I compare the photo from my last post(which was taken yesterday) to the photo from the week I started WW, I can see a difference.


Now some of it may be the hideousness of the before outfit, or the angle of the camera, but I do see a difference, and I really hadn't until I compared these two photos.

Seeing the difference in myself has given me a boost! I'm resolved to stay on plan and work the plan in a healthier way!  Yes, on WW you really can drink regular cokes and eat the occasional candy bar and still lose weight, BUT, that's not using the plan to it's full advantage! I'm going to pay more attention to my daily points, be smarter about the plan by taking advantage of those 0 point fruits & veggies, and make it a priority to get some regular exercise.

 I've seen that I can be successful and lose weight by going about it halfway, so I'm pretty excited to see what I accomplish when I give it my all!


Sunday, January 15, 2012

I fall for Simplicity's "It's SO Easy" lie yet again.

In my last post I talked about how I was determined to make my own clothes this year...at least a few pieces. I was pretty excited about it and very much looking forward to getting started.

In fact...here's my first finished dress! Not bad, eh?
My bangs have a mind of their own...tonight they're saying "I'm going to look ridiculous!"
Now, before y'all get too impressed you should know this is a complete farce of a photo! It's amazing what a strategically placed belt, a giant hair clip(for hiding excess fabric) and my magic cowboy boots* can do! But at least in this photo it appears that I can make a dress!


Here's the reality of it...


What I made was a saggy, baggy, tent of a dress. The picture doesn't really do justice to how giant the skirt part is nor how ill fitting and wonky the top is. But it's bad, y'all. I actually put it on this morning thinking I'd wear it to the grocery. My husband said it looked like I was wearing a bell! So I grabbed my go-to for fixing wonky outfits, a denim jacket. It actually looked worse. Way worse. Especially from the side veiw.

I spent hours on it. HOURS. So much for Simplicity and that "It's SO Easy" bull printed on the pattern pack. I don't know how many times I have fallen for that one, but it's  never been "SO Easy"!  This time was no exception.

Although, as I was going along, I was feeling pretty confident! I got the skirt put together. I totally rocked the bodice. It's putting the two together where things went south.

And I know (now) what I did wrong.

I cut the bodice a size smaller than the skirt.  D'OH!  In my defense, I was using my measurements and following the pattern pack guidelines.  The bodice was supposed to be slightly gathered before sewing to the skirt. Since it was a size smaller, it didn't end up fitting the gargantuan sized skirt (which was cut to what I thought was my size). So I fiddled, un-gathered, and generally messed with the two pieces trying to get them to fit together until I got to that "I'm just going to sew the thing" point.

And then came the super fun job of trying to sew an elastic casing through all those layers and puckers and aforementioned mess.  Followed by even more fun...trying to thread the elastic through casing that way to small in more than one place. Super super fun.


If any of you notice a peculiar cloud floating by, pay no attention, it's probably just the remnants of the cussin' fit that accompanied the whole elastic casing/threading elastic business.

Despite my resulting tent dress, there were some good things that came out of this little adventure:
  • It was a good learning experience. I know what size to cut the next time and I will cut the top and bottom the same size. I think that might solve some of the trouble I had with the casing issue as well as the fit problems.  
  • It didn't end up in an angry heap forever banished to a ziplock bag in my closet. I finished it! I might even go back and work on it some more. Months from now.
  • I  actually made a dress. It was my first try, and even though I can't wear it, it is clearly a dress. I'd call that a success! 
My next sewing adventure will consist only of things I know I can sew successfully, like aprons, bags and quilt blocks. But I'm not ready to give up on making clothes just yet. I'm just not ready to try it again anytime soon!


*my cowboy boots aren't really magic

Sunday, January 8, 2012

And She Will Make Clothes in 2012!

Despite the fact that I've already got big plans to do a boat load more quilting and sewing this year, I rediscovered a website this morning that has me chomping at the bits to add more to my to-do list.

The Sew Weekly. I stumbled upon it through pinterest a while ago and pinned a couple of "Make this Look" posts. These posts show an inspiration piece from Modcloth or Anthropologie and a very similiar sewing pattern and fabrics, allowing you to create your own version of the originial. Brilliant!

This morning I spent at least an hour looking through the "Make this Look" section and scouring over gorgeous and fun vintage inspired outfits that users had made. 

Like this dress, which I am currently coveting.


I'm certain there are a ton more goodies on the site.  Which means I'll have to spend even more time there. Oh, bother. 

Still, that hour I spent at looking at the creations of others, has totally inspired me to drag out some sewing patterns and get busy!

I'll mention that sewing clothes is not what I'm most comfortable with. A simple handbag? Doable. An apron. No problem! A skirt? I've made exactly two. This one. and This one. I've got two more wadded into heaps in ziplock bags and thrown into the back of my sewing closet, perhaps never to see the light of day again. I've started two blouses...one is in much the same shape as the two skirts mentioned above and the other was so bad that I just threw it away, pattern, pins, and all.  I've yet to tackle a dress.  Zippers and the mention of piping make me break out in hives.  Pants? Just plain scary.

Still, despite my past experiences with garments, I am inspired to try again! 

Between all the other creative things that I want to do and the fact that I have to go to work on a daily basis, I will somehow make time to myself some clothes. Clothes that (1). I can wear in public and (2). Won't end up in a sad heap confined to a ziplock bag.

The only thing I'm lacking are cute vintage patterns in my size and enough yardage to make clothes. I buy in FQ, Half and One Yard cuts...because that's what works for me w/quilting and the things I normally make. But that's an easy fix! I'm going to start thinking "more" when it comes to yardage!

The vintage patterns are probably going to be above my current level of skills, so I'm content with pulling out some A line skirts and the two simple dress patterns that I own. Once I master those, I'm totally moving up to the vintage inspired stuff and I will be making one of those Modcloth inspired dresses...like this one. 


Now, I'm officially requesting that more hours be added to the day. 

Tuesday, January 3, 2012

Scrappity Scrap Scraps!


2012 Sew Scraps Along There's something really exciting going on over at Pleasant Home!

For the entire month of Janurary, Pleasant Home is hosting Sew Scraps Along 2012. In addition to giving us tips on organizing our scraps and providing scrappy inspiration, PH is featuring a bevy of ways to use up those scraps that taunt you from sewing closets, bins, or wherever you hide them!

The first featured scrap project is a dreamy picnic quilt from Freda's Hive. I want to make one. Right now.

With an ever growing, getting out of control in a scary kind of way scrap stash, I'm pretty stoked about this month of scrapbusting ideas!

So excited, in fact, that I'm going to go visit my scrap stash right now!

Sunday, January 1, 2012

Not Exactly Resolutions

I think of it more as a vision than a list of resolutions.

Looking ahead into 2012, I can see that: 
  • I'm enjoying spending more time with my precious family.
  • I'm a better wife, daughter, sister, aunt, friend.
  • I am thankful more often.
  • I'm doing something creative every day, even if it only amounts to a doodle on a sticky note.
  • I've re-opened The Laughing Otter, am enjoying the creative outlet, and making a profit.
  • I'm taking care of myself for those who love me.
  • I'm working smarter and with renewed enthusiasm.
  • I'm relaxing as much as possible and reading more than ever.
  • I'm learning new things.
  • I smile and laugh even more than I did in 2011.

Here's hoping you have a wonderful 2012!

Friday, December 30, 2011

Blue On Wednesday

I didn't plan it this way, but I think it's pretty cool that the first quilt I made in 2011 was a mini art quilt...
Fan Art Piece inspired by a local movie production company
... and my final quilt of 2011 was also a mini art quilt!

I'd had kind of a crappy day on Wednesday and after coming home from work, moping around and looking at the walls for a while, I decided that doing something creative was the only thing that would make me feel better.

I started by covering a scrap of white fabric in gesso, then painting this small portrait using watercolors.


Next, I added some thread sketching--my first ever attempt--to the hair. And yes, after it initially dried, I went in and added more paint, changing the look of the face.
thread sketching/painting(?) detail
Finally, I made a small quilt, added some shapes using raw edge applique and then zigzagged the portrait on top of everything...and yes, added more paint, changing her face yet again!


I'm going to do something that is extremely difficult for me and refrain from my usual self depricating, "I'm not an artist/quilter/seamstress/ so look at everything that is wrong with this" hooey and say this instead: I am proud of this little quilt! I'm not proud because I think it is a great work in either the art or quilting realm. I am proud that I had an inkling of an idea that I was able to turn into something real; that I was able to overcome "the blues" in a creative way; that I did it without using someone else's pattern and followed my own nose instead.

Tuesday, December 27, 2011

Mom's Pinwheel Sampler

So for all the yammering I have done about this quilt since January of 2011, I thought I should show off the finished product.
In case you didn't read the gazillion other posts about this quilt, I followed the Pinwheel Sampler Quilt-Along instructions on P.S. I Quilt. Those instructions were easy to follow and I love how pattern uses just one layer cake and some yardage, but results in a nice size lap quilt!. I sent it to a local gal to have it quilted--she did a wonderful job.  I machine applied the binding even though I said I would never do that again.  My excuse it that it wouldn't have been finished on time otherwise. Even though I don't love the sloppy binding, I'm happy with the way this one turned out!

Mom loved it!

Coming soon...the final version of the I-Spy Quilt that I made for my nephew!

Tuesday, November 8, 2011

The One Where I Battle a Baby Quilt for an Entire Day

One of my quilt club's service projects is making and donating baby quilts to our hospital's NICU. At our last retreat some of the members shared a quick and cute baby quilt that used only four fat quarters. I completed a quilt top that weekend and it's been sitting in my closet since the summer waiting to be quilted.

Since we had a meeting tonight and there was no school today I decided I'd free motion quilt it. The last quilt I attempted free motion on was this quilt for my nephew. I like the look of free motion better than straight line and want to get better at it. Besides, I don't always have the money(nor do I want to wait) to take my quilt to a long arm quilter.

So many things went wrong with this one. I had tension issues, picked out quilting four times before deciding that "chicken feet" on the back weren't that bad. And then I made the decision to apply the binding by machine. It was so not a good decision! Someday I will learn to stop trying that.

But I did manage to finish it. Hours later.

Despite the fact that I spent the entire day working on this quilt in order to turn it in at tonight's meeting, dork that I am, I could not bring myself to present it to the group. No one else brought finished baby quilts, when normally there are 5-10 a meeting, and I wasn't about to let this one be the only one shown.

I do love this cute dog print from JoAnn's.
My plan is to make another, much more fabulous quilt to turn in with this one at the next meeting. I figure the fabulous one will overshadow all the mistakes in this one. Not that the ladies in my quilt club would say anything, they are wonderful, nonjudgmental and understand I am nowhere near their level yet. I, however, am my own worst critic.


It actually looks pretty decent...if you don't look too close and definitely not at the back. Or the binding. 

Even though I made a lot of mistakes and took waaaay too long to finish, it was a good practice and hopefully, the recipients won't notice the mistakes that are glaring at me.

I plan to add a full tutorial of this at some point, but in the meantime, I think you can figure out fabric placement, so here are the Measurements that you'll need:

FQ Number 1: Full FQ for center (18"x22")
FQ Numbers 2 and 3(here I've used the same fabric for both): 2 Pieces 8.5" x 22" and 2 pieces 8.5" x 18"  These will make the border around your focus FQ.
FQ Number 4: 4 8.5" Squares for the corners.

Again, you can see how this goes together in the first photo...super fast and super easy! Add a backing, quilt it, sew on the binding and there you go!


Saturday, October 15, 2011

Jelly Roll 1600!

I saw this video on another blog a while back and thought it looked like such a fun project!


Before I begin on an I-Spy quilt for my nephew, I think I'm going to try one of these. It looks like it doesn't require much thought, planning, or precise cutting.  I am SO ready for this type of project.

A fun guild activity, this would be a good project for beginning quilters too...not really much to have to worry about matching and using the one jelly roll would avoid a lot of fabric confusion! Nearly every shop sells them and there are a bazillion available on etsy and other online shops.

The instructions for making a Jelly Roll 1600 and photos of more finished Jelly Roll 1600s can be found on the Heirloom Creations Blog. There are even more photos of JR1600's over at Nacho Mama's Quilt.

The only thing I plan to do differently is use small strips to join the rows rather than joining them on the bias. I get no joy whatsoever out of joining strips on the bais, hence the plan to use strips.

I'll be using this batik jelly roll that I bought at JoAnn Fabrics. I love batik fabrics, but I generally can't afford them. This one was on sale at JoAnn's about three years ago and I had a gift card. It's a little sad that it sat in my closet for three years waiting to be used. I'm happy to have finally found a project to put it to good use!

Pinwheel Progress


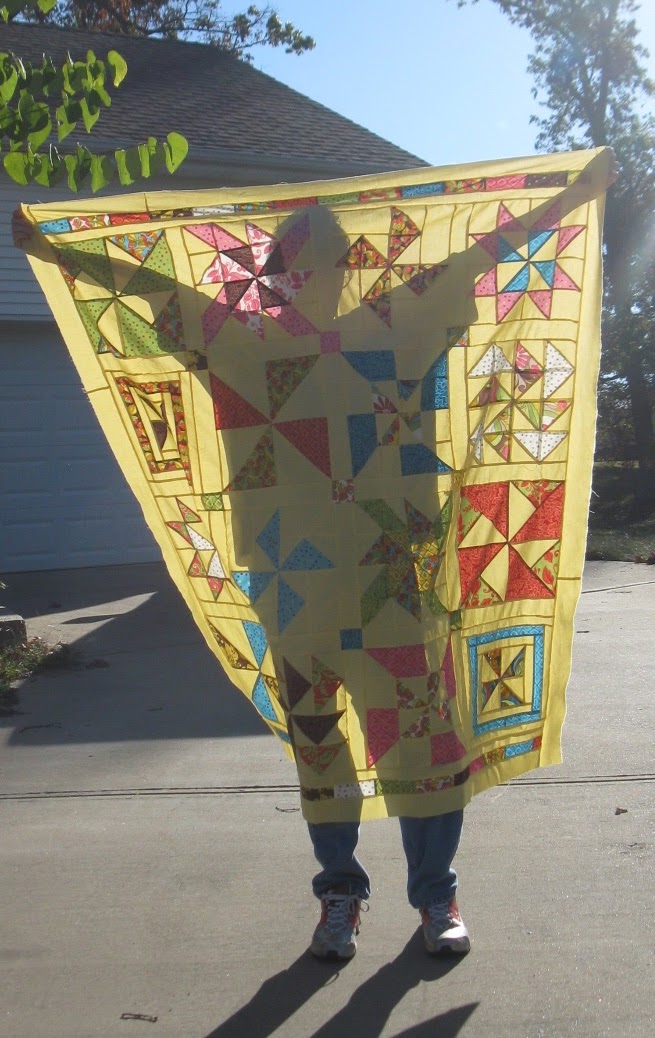
Here she is! This is the Pinwheel Sampler quilt top that I started in January through an Independent Block of the Month at my local quilt shop. I decided on Rachel Griffith's Pinwheel Sampler because I love love love pinwheels and I thought it looked manageable for my current level of quilting skills.

It was not a difficult quilt at all, but in my haste to finish blocks before the monthly deadline I did some sloppy cutting and too fast sewing. I also sewed about half with my regular foot and the other half with my 1/4 foot, so it is not as crisp and perfect as it could have been. I'm trying to be OK with that!

Since I just finished it up mere minutes ago, I'm still seeing every single flaw and cut off point(there are lots). I'm hoping a lot of those problems will "quilt out" or at least be less noticeable.

 I'm about 95% sure it's going to be a Christmas gift for someone special and I don't think this person will notice the mistakes that are glaring at me. She will love the buttery yellow background and bright colors, however!

A couple things I did that weren't in the original tutorial were to add strips to the top and bottom (I wanted to use as much of my layer cake as possible) and I added the nine cornerstone(?) blocks to the middle. I didn't want to take these all the way out to the border so I sort of framed the inner blocks with them. I kinda like the way that turned out!

My goal now is to have it quilted by November and bound before Christmas.


Finally...I had to add this picture of my Quilt-Holder-Upper. He may grumble the entire time I try to take a photo of a quilt, but he always obliges! Thanks Mark, I ♥ you!

Tuesday, October 11, 2011

Candy Corn Butterfingers

I have developed a bit of an addiction to Pinterest as of late. One of the first things I "pinned" was this photo linking a recipe for homemade Butterfingers.
Photo Source: http://www.thesaltypineapple.com/2011/08/i-love-food.html
When I realized the recipe consisted of only three ingredients, I had to try it!  You'll notice that I don't have a photo of the bars I made. Mine weren't quite as pretty as these. They weren't so much bars as they were nuggets, chunks and pieces. This was probably due to the fact that I did not let them set up as directed. Being impatient, I simply shoved the dish into the freezer and busted 'em up when they were cool. Despite their unpretty looks, they tasted fantastic! And yes, they taste like actual Butterfingers, but the texture isn't as flaky or crunchy. They were good, Y'all!  These are going onto my Christmas candy rotation!


Candy Corn Butterfingers

1 lb. candy corn
16oz jar peanut butter 
16oz pkg. chocolate candy coating

Melt candy corn in microwave on high 1 minute. Stir and continue cooking in 15-second intervals until melted, stirring after each interval. Stir in peanut butter. Spread mixture in a buttered dish(I used cooking spray). Cool completely. Cut into squares. Dip in melted chocolate candy coating. Lay on waxed paper to set.

Saturday, October 8, 2011

She's Three Pinwheels Shy of a Quilt

Back in January, I joined an Independent Block of the Month at my local quilt shop.  I figured it would be a fun way for me to actually complete a quilt. I'd have a year to work on it at a pace that I set myself. The pace I set for myself was that of a turtle. A sleep deprived turtle. Yet I've still managed to end up behind on this project!

My IBOM quilt is the Pinwheel Sampler  from one of my favorite quilty blogs, P.S. I Quilt. Now when they were doing the exact same quilt they finished it in something like  ten weeks. It's taking me a year, Y'all. A year!

This week is my Fall Break, so I am off work for an entire week[insert happy-screechy-jumpy-WaaHoo-yell here] and I intend to get back on track with this quilt!

Umm, except for the fact that I have something planned nearly every single day of the break....

and my next BOTM meeting is this coming Saturday....and I'm supposed to have the thing sashed by then too!  YIKES!


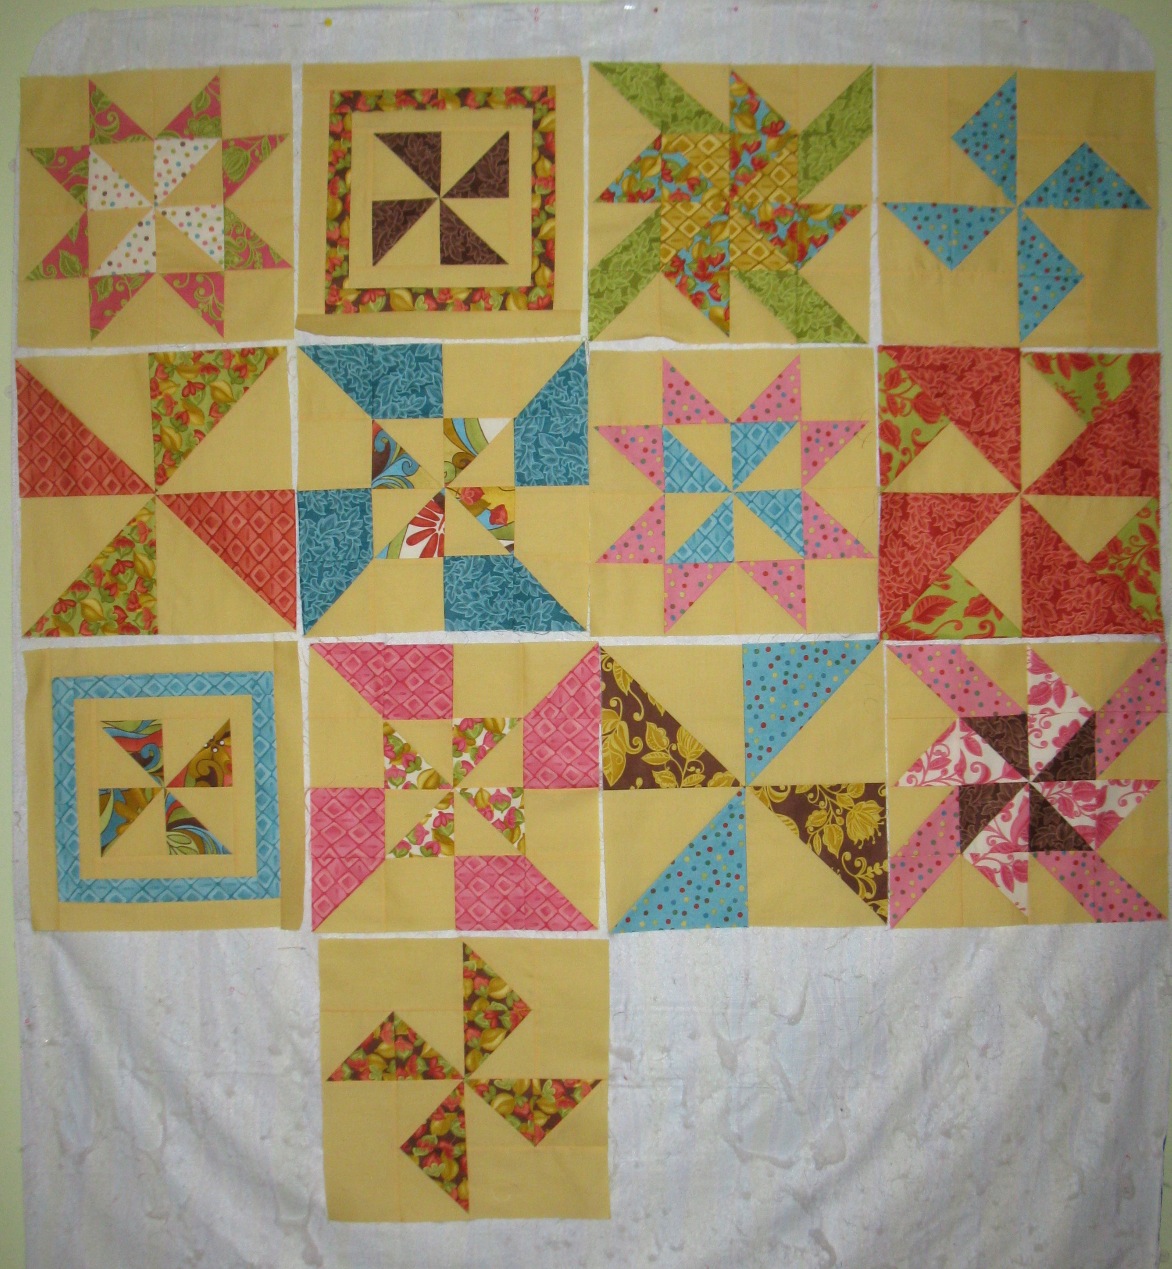
I thought I had caught up on it tonight after finishing these two blocks.


When I put the blocks on my design wall, I realized that I was missing three more blocks! Ugh. One of those I distinctly remember trying to square up and lopping off about 1/4 inch more than I should have on all sides. The other two...I don't know what happened. But as luck would have it, they look to be the most time consuming block of the entire set. Yay!! [insert grumbly incomprehensible cussing here]


Hopefully tomorrow I can finish up those other three blocks and begin the sashing(which has to be done by Saturday). When that's all done hopefully I can fall in love with this quilt again. Right now, we aren't even on speaking terms. 

Thursday, September 29, 2011

Yeah. That's right. I made some quilt tops.

Last Saturday I went to a Stack-N-Whack class at my local quilt shop. I had never been the least bit interested in making one of these quilts until I saw some of the blocks a friend was making. Her use of modern fabrics hooked me on the idea of making a Stack-N-Whack myself immediately!

The yellow is a tad loud, but my plan is to have it quilted with gray thread, which should tone it down. I'd try to explain how to get the kaliedescope effect to you in a bit more detail, but it wouldn't make a bit of sense! In a nutshell, fabric gets stacked by repeat prints, cut into rectangles, then once more into triangles and with the addition of a background fabric, that print is magically turned into these spinning beauties!

 To get the actual scoop on how to make these quilts, check out Bethany Reynold's website or pick up a copy of one of her books. She's the genius who came up with this method.

This may be the most addicting quilt top I've made to date! I started Saturday and finished on Monday! How's that for quick?

I'd loooove to try this in a monochromatic color scheme!

This one is currently unnamed.

Next up is the Vintage Sheety Quilt I started back in the summer.  I do loves me some vintage sheets!

This was supposed to be a picnic quilt(for all those picnics we never go on), but I fear by the time it's actually quilted, it'll be a Happy New Year! quilt.  I'm calling this one Fifteen Sheets to the Wind.

Projects in the works:

  • Pinwheel Sampler quilt
  • Grey zig zag quilt
  • Quilt #2 for my most awesome nephew, who just happens to be the cutest boy in the world.

Easy Canvas Print? Heck Yes!

I was contacted by a representative from Easy Canvas Prints a while back asking if I would like to review a product. I would get to choose a one of my photos and have it made into a canvas print. I jumped at the chance!


After much debate, I decided on this photo that I took at the Vienna Prater when I visited Europe a few years ago.  There are a few more photos from the park here.


And here's how it translated to canvas.  Please, as always, excuse the crappy lighting. 

I am very pleased with the canvas! I should also add that the website was a snap to use and it shipped quickly. 

I decided to hang it with a few other travel related pieces on my "Wall O' Art".  One, a photo my sister took in New Orleans. The other is a painting that I bought on the Charles Bridge in Prague....it's my favorite souvenir ever!


Here's how it looks on said Wall O' Art. I know it seems like a sparse collection right now, but someday I want to fill this entire wall with more photos, paintings, prints, etc. In addition to the three above are drawing of my dog Mya, a gift from my dear friend and phenomenal artist, Mary, a Natasha Wescoat print, and a Shag Tiki Room print, a gift from my husband. 


They are currently running a 25% off sale with free shipping over at Easy Canvas Prints! Thanks again, guys for giving me the opportunity to review your great product! I think I'm gonna need a few more to help balance and fill out this wall!

Wednesday, September 7, 2011

Pumpkin Brownies

I was watching an episode of Hungry Girl on Food Network the other day and she made these absolutely yummy looking fudgey-brownies using a can of pumpkin, some peanut butter, light chocolate syrup and a box of brownie mix. It's not the first time I'd thought of trying this recipe, but seeing her eat them and hearing her talk about how wonderful they tasted, well it made me have to try making them.


I didn't have any chocolate syrup, so I mixed the brownie mix and pumpkin.

Next I added 2TBS of melted peanut butter to the batter and made it all pretty.

Baked at 350 for about 40min.

Don't they look yummy?


So. Not. Yummy. They weren't terrible, but they didn't taste like any brownie I've ever eaten. They had a weird(pumkin, no doubt) flavor that I just could not get past. I wonder if the chocolate syrup would have eliminated some of the pumpkin flavor?  Looking at the photo I can almost hear them saying "I'm not what I pretend to be".

They weren't for me, but that doesn't mean it's a bad recipe...my Vegan Husband loved  them!

Tuesday, July 12, 2011

New Arrival

I've been blatantly absent from the blog as of late.

The reason....

 This precious little guy(all 9pounds, 1oz. & 21 inches of him) came into our lives on July 7.  My parents and I had been staying with my lil' sis in Chicagoland 2 weeks prior to his arrival and were there when he was born.

Mommy, Daddy and Baby are doing great and the family couldn't be happier.

Aunt Kellie is 100% in love with her nephew.

Shhh! It's Really a Towel Rack.


While I haven't been crafting much lately, I have been doing a bit of shopping. I'd been wanting a quilt rack for a while...after all, it's kind of sad to make a quilt only to shove it in the closet. All I had been able to find locally was the standard oak rack with hearts cut out on the sides. Not exactly my style, so in the closet my quilts went. While perusing IKEA in Chicagoland, I came across this towel rack. I think it works well for displaying smaller quilts, which are what I prefer to make! I'd like to hang the larger quilt(left), but haven't decided on exactly how to do that. I would really love to know your thoughts on hanging and displaying quilts. 

Thursday, June 23, 2011

Wonky Log Cabin Tutorial

I was recently asked to do a demo of how I made the wonky log cabin blocks in this quilt top at my quilt club's summer retreat. Knowing I'd be a nervous wreck(these ladies are Real Quilters), I decided it might not be a bad idea to have something concrete to back up my rambling demonstration. I photographed my process and typed up some directions. I thought I'd share it with y'all as well.


I didn't invent the wonky log cabin(also called liberated log cabin or improvisational log cabin), but I do love to make them!  There are several other tutorials out there...this is my method. I make them at 6.5 or 9.5 inches because those are sizes of my square rulers.

What you'll Need:
  • A pile of strippy scraps, at least one of the long edges should be trimmed nice and straight. Nearly any width will do. These will be your logs.
  • A pile of 2"-4" fussy cut squares for the center. 
  • rotary cutter
  • 6.5" ruler
What You'll Do:

Choose one of your square(ish) shapes and a scrap of fabric for the first "log).


The pin is there to help remind me how the block is oriented
Lay the log down on your square in a "wonky" manner and sew using a 1/4 inch seam along the outer edge of the log. It might feel weird and uncomfortable to not have your edges lined up. Do it anyway!


Trim away that ugly edge.
You're left with something like this.
Trim the edges.
Repeat this process to continue building your block.


It's OK if some of the edges are non-wonky!
If you feel your block is getting a bit out of control, you can trim it up after the first round of logs is complete.


Repeat the process until you have a block that is a bit larger than 6.5". Depending on the width of your logs,  your block may have two or three rounds of logs.
When completely finished, you'll have something that looks like this.
Use your 6.5" square ruler to trim up the block. If you have enough "extra" fabric, you can wonky it up even more!
OK, at this point, I should note that I my camera batteries ran down and I don't have the finished block to show you. But I CAN show you a photo of the finished block...I made several of these blocks for a fun table runner!

That's it! Hope you enjoyed and if you make any wonky log cabins using this method, I'd love to see them!