Thursday, July 19, 2012

Coco-Pineapple Sticks

I'm a fan of both pineapple and coconut, so I couldn't wait to try this simple little snack from the July/August issue of WW Magazine!

As it turns out, it was not only simple but scrumptious in a frosty-frozen-pineapple-y way! And, according to the mag, it'll only cost you 2PointsPlus.


Start with a cored pineapple, coconut, some skewers, a bowl for dipping and a plate or baking sheet for the freezer.


Cut the pineapple into 1"x 3"(ish) chunks and add skewer. Sample some of that fresh, pretty, sweet pineapple. Not because you can't help yourself...just to make sure it tastes OK of course. 


Toast up some coconut, about 1 cup. Try not to eat it all before you dip the pineapple.


Roll the pineapple in the coconut. Or do what I did...smush the pineapple into the coconut because rolling wasn't getting it coconut-y enough! The magazine suggests that you dip the pineapple into pineapple juice before rolling in the coconut. My pineapple was pretty darn juicy to begin with and I didn't have any pineapple juice on hand, so I skipped that step. Don't think it affected the outcome much.


Take a couple of gratuitous pineapple/coconut shots before sticking your plate of goodness into the freezer.


In approximately 2 hours, your coco-pineapple sticks will be frozen to perfection! Enjoy them on their own or with a slab of angel food cake...my preferred way!

Wednesday, July 18, 2012

Fabric Scraps Wrangled. Sewing Closet Situation Averted.

Those among you who sew or quilt will appreciate this. The rest of you may think I have lost my mind for posting about and taking photos of a closet.

I don't know a single person who sews and/or quilts who doesn't have at least a small fabric stash that includes some scraps. My stash, I would guess, is on the smallish side, but I do have a lot of scraps from various projects and they got completely out of hand.

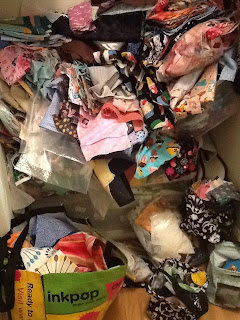
Y'all know how that can get away from you. One minute you have a couple ziplock bags of scraps piled into a tote and the next thing you know it looks like this: 


The Pile...my scrap fabric nightmare.  How in the world do you find something in the midst of that mess? You don't! You dig through The Pile in search of the perfect shade of blue for a project. You know it's there. You put it there yourself. But The Pile has eaten it, never to be seen or heard from again. So you completely give up, frustrated, hot, and grouchy without ever starting on the project at hand. And then you actually consider tossing every single scrap since all they do is make you mad.

At least that's been my experience. 

Not too long after one of my rounds with The Pile, I  came across the book Sunday Morning Quilts by Amada Jean Nybergh and Cheryl Arkison. I quickly snagged a copy!


Finally! A book that shows not only how to use scraps in a quilt, but gives you practical tips on storing and organizing them as well! Cue angels singing. You can currently pick up a copy of Sunday Morning Quilts for a great price at Connectingthreads.com. I love that shop!
                                     
After reading the book and wiping the drool off the photos of these amazingly gorgeous scrappy quilts (seriously, I want to make them all), I got busy. I was inspired not only to make my scrap pile useful, but to organize my sewing closet as well. I don't have photos, but trust me, finding fabric in my stash wasn't much easier than digging through those scraps. 

My budget for organizing my scraps and the sewing closet in general was  about 15 bucks. I'm not kidding. SO I drug home a plastic shelf from my parent's garage, headed to my local Kmart and picked up some clear plastic shoebox sized totes and got busy sorting.

When I was finished, THE PILE had become this...


So. Much. Better.  I was so happy with my little shoeboxes of color that I decided not to shut them up in the closet, but to leave the out in the open on a bookshelf in the sewing/computer room!


Once I had the scraps tackled, I was motivated to finish up the rest of the closet. My mother saw it and said "I don't think you need to buy anymore fabric".   She's right, of course.

I know it's plastic shelving and nothing fancy, but this makes me soo happy. I know I can walk into the closet now and find anything I need within minutes with no cussin' or cryin'! 


Even room for a little art on the walls. And yes, a Kona card qualifies as art! 


FQs, mostly sorted by colors. 


More FQs...my most favorites, so they're out in t he open for me to drool on look at.


...and more fun stuff...


All this organizing and I'm ready to tackle a new project!

Thursday, July 12, 2012

Cupcakery

A couple of trips to GiGi's Cupcakes absolutely did me in. I mean, I liked cupcakes before, but GiGi's Cupcakes? Lord. Have. Mercy. These are wedding & chocolate varieties. So good.


I don't have a photo of it but the Lemon Poppyseed with Cream Cheese Frosting...Heavenly.

But after plopping down nearly four dollars per cupcake(numerous times) I eventually got to the "I can make an entire batch of cupcakes for four dollars" place.

And so began my cupcake obsession. I picked up the easy-cheesy cupcake decorating kit at Walmart.


My first batch of cupcakes were from scratch. SCRATCH. With buttercream icing.


I realize they aren't that pretty but Holy Moly, these were some dang tasy cakes! The flavor was not unlike that a sugar cookie! Yummy! The recipe for the cake can be found here. The icing was equally delicious and that recipe is right here

Next up, cupcakes for my friends at work. These are mini sized and made from a  box-mix (with some mayo added to make them extra moist) and topped with yummy Oreo Decorator Icing. Oh, they were good and being bite sized was perfect for the amount of sweetness.
 

I joined a local chapter of Free Cakes for Kids and my first assignment was, you guessed it, cupcakes! The little girl I baked for was turning seven and requested white cupcakes with pink icing. My kind of gal! 

Again, just a plain ole' box cake, but the icing makes it sooo good. This was my best attempt at icing yet...I was eating the stuff by the spoonful! I made a decorator icing using 1 stick of butter and 1/2 cup of Crisco(creamed together). I mixed in a bag of powdered sugar(a little at a time), whole milk, and a teaspoon or so of vanilla. Just kinda kept adding sugar and milk until it tasted right. I haven't made one as tasty since. I got word that the birthday girl was "tickled pink"with her cupcakes!


Speaking of birthday cupcakes, my brother requested chocolate cupcakes with chocolate icing for his birthday. I was thrilled to finally get to use the vintage clown pics I snatched at a flea market a while back. Again, I used the mayo + chocolate box cake trick. These have a chocolate buttercream icing. I was not a fan(I prefer white cake, white icing), but my brother and the rest of the family loved them. 

Granted, they aren't GiGi's and yes, I realize all my cupcakes are decorated with that same ole' swirl. I have yet to branch out into flavors like lemon or red velvet, but I'll get there! Also, I've made several more batches that aren't pictured...they were either too ugly for documentation or were eaten before documentation could occur.

Soooo, does anyone else suddenly crave a giant glass of ice cold milk?