Thursday, July 19, 2012

Coco-Pineapple Sticks

I'm a fan of both pineapple and coconut, so I couldn't wait to try this simple little snack from the July/August issue of WW Magazine!

As it turns out, it was not only simple but scrumptious in a frosty-frozen-pineapple-y way! And, according to the mag, it'll only cost you 2PointsPlus.


Start with a cored pineapple, coconut, some skewers, a bowl for dipping and a plate or baking sheet for the freezer.


Cut the pineapple into 1"x 3"(ish) chunks and add skewer. Sample some of that fresh, pretty, sweet pineapple. Not because you can't help yourself...just to make sure it tastes OK of course. 


Toast up some coconut, about 1 cup. Try not to eat it all before you dip the pineapple.


Roll the pineapple in the coconut. Or do what I did...smush the pineapple into the coconut because rolling wasn't getting it coconut-y enough! The magazine suggests that you dip the pineapple into pineapple juice before rolling in the coconut. My pineapple was pretty darn juicy to begin with and I didn't have any pineapple juice on hand, so I skipped that step. Don't think it affected the outcome much.


Take a couple of gratuitous pineapple/coconut shots before sticking your plate of goodness into the freezer.


In approximately 2 hours, your coco-pineapple sticks will be frozen to perfection! Enjoy them on their own or with a slab of angel food cake...my preferred way!

Wednesday, July 18, 2012

Fabric Scraps Wrangled. Sewing Closet Situation Averted.

Those among you who sew or quilt will appreciate this. The rest of you may think I have lost my mind for posting about and taking photos of a closet.

I don't know a single person who sews and/or quilts who doesn't have at least a small fabric stash that includes some scraps. My stash, I would guess, is on the smallish side, but I do have a lot of scraps from various projects and they got completely out of hand.

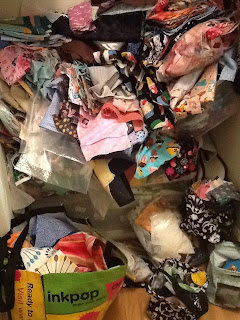
Y'all know how that can get away from you. One minute you have a couple ziplock bags of scraps piled into a tote and the next thing you know it looks like this: 


The Pile...my scrap fabric nightmare.  How in the world do you find something in the midst of that mess? You don't! You dig through The Pile in search of the perfect shade of blue for a project. You know it's there. You put it there yourself. But The Pile has eaten it, never to be seen or heard from again. So you completely give up, frustrated, hot, and grouchy without ever starting on the project at hand. And then you actually consider tossing every single scrap since all they do is make you mad.

At least that's been my experience. 

Not too long after one of my rounds with The Pile, I  came across the book Sunday Morning Quilts by Amada Jean Nybergh and Cheryl Arkison. I quickly snagged a copy!


Finally! A book that shows not only how to use scraps in a quilt, but gives you practical tips on storing and organizing them as well! Cue angels singing. You can currently pick up a copy of Sunday Morning Quilts for a great price at Connectingthreads.com. I love that shop!
                                     
After reading the book and wiping the drool off the photos of these amazingly gorgeous scrappy quilts (seriously, I want to make them all), I got busy. I was inspired not only to make my scrap pile useful, but to organize my sewing closet as well. I don't have photos, but trust me, finding fabric in my stash wasn't much easier than digging through those scraps. 

My budget for organizing my scraps and the sewing closet in general was  about 15 bucks. I'm not kidding. SO I drug home a plastic shelf from my parent's garage, headed to my local Kmart and picked up some clear plastic shoebox sized totes and got busy sorting.

When I was finished, THE PILE had become this...


So. Much. Better.  I was so happy with my little shoeboxes of color that I decided not to shut them up in the closet, but to leave the out in the open on a bookshelf in the sewing/computer room!


Once I had the scraps tackled, I was motivated to finish up the rest of the closet. My mother saw it and said "I don't think you need to buy anymore fabric".   She's right, of course.

I know it's plastic shelving and nothing fancy, but this makes me soo happy. I know I can walk into the closet now and find anything I need within minutes with no cussin' or cryin'! 


Even room for a little art on the walls. And yes, a Kona card qualifies as art! 


FQs, mostly sorted by colors. 


More FQs...my most favorites, so they're out in t he open for me to drool on look at.


...and more fun stuff...


All this organizing and I'm ready to tackle a new project!

Thursday, July 12, 2012

Cupcakery

A couple of trips to GiGi's Cupcakes absolutely did me in. I mean, I liked cupcakes before, but GiGi's Cupcakes? Lord. Have. Mercy. These are wedding & chocolate varieties. So good.


I don't have a photo of it but the Lemon Poppyseed with Cream Cheese Frosting...Heavenly.

But after plopping down nearly four dollars per cupcake(numerous times) I eventually got to the "I can make an entire batch of cupcakes for four dollars" place.

And so began my cupcake obsession. I picked up the easy-cheesy cupcake decorating kit at Walmart.


My first batch of cupcakes were from scratch. SCRATCH. With buttercream icing.


I realize they aren't that pretty but Holy Moly, these were some dang tasy cakes! The flavor was not unlike that a sugar cookie! Yummy! The recipe for the cake can be found here. The icing was equally delicious and that recipe is right here

Next up, cupcakes for my friends at work. These are mini sized and made from a  box-mix (with some mayo added to make them extra moist) and topped with yummy Oreo Decorator Icing. Oh, they were good and being bite sized was perfect for the amount of sweetness.
 

I joined a local chapter of Free Cakes for Kids and my first assignment was, you guessed it, cupcakes! The little girl I baked for was turning seven and requested white cupcakes with pink icing. My kind of gal! 

Again, just a plain ole' box cake, but the icing makes it sooo good. This was my best attempt at icing yet...I was eating the stuff by the spoonful! I made a decorator icing using 1 stick of butter and 1/2 cup of Crisco(creamed together). I mixed in a bag of powdered sugar(a little at a time), whole milk, and a teaspoon or so of vanilla. Just kinda kept adding sugar and milk until it tasted right. I haven't made one as tasty since. I got word that the birthday girl was "tickled pink"with her cupcakes!


Speaking of birthday cupcakes, my brother requested chocolate cupcakes with chocolate icing for his birthday. I was thrilled to finally get to use the vintage clown pics I snatched at a flea market a while back. Again, I used the mayo + chocolate box cake trick. These have a chocolate buttercream icing. I was not a fan(I prefer white cake, white icing), but my brother and the rest of the family loved them. 

Granted, they aren't GiGi's and yes, I realize all my cupcakes are decorated with that same ole' swirl. I have yet to branch out into flavors like lemon or red velvet, but I'll get there! Also, I've made several more batches that aren't pictured...they were either too ugly for documentation or were eaten before documentation could occur.

Soooo, does anyone else suddenly crave a giant glass of ice cold milk?

Wednesday, March 14, 2012

Vintage Thingie Thursday -- Tablecloth Purse


I love vintage linens. Especially tea towels, sheets, and tablecloths. I have a closet full of all three. I was recently perusing Etsy.com when I came across this lovely little Spring/Summer bag made from a vintage tablecloth.

It was love at first site. I had to have it.

It's one of my favorite vintage-nouveau thingies!

For more Vintage Thingie Fun, Head on over to The Colorodolady!

First Finish of 2012 -- A Process Post

Yeah, yeah, yeah. I realize it is MARCH and I should have already had a finished quilt. But hey, I'm a busy gal!

I'm happy to show off my first finish of the year, though. This quilt is for the soon-to-arrive grandchild of a dear friend. When I asked my friend baby colors, she said "soft pinks and greens". Those aren't colors I typically buy and as I mentioned in an earlier post, I am on a fabric buying diet...trying not to buy any quilting fabric unless it is for backing. I am proud to say that everything in this quilt--except the binding--was from my stash. Hooray!

The patchwork blocks are made from two Lilly and Will Moda charm packs that I bought ages ago. I pulled out only the pinks and greens from each stack and "fiddled" with them until I came up with the idea to do four patch blocks and sash them w/a wide border. Please ignore my hideous design wall/cat scratcher.


After digging through my stash, I found an off white print that actually had enough yardage for the sashing AND the backing. Woo Hoo! 

My last attempt at free motion quilting was a pain in the neck, so I opted to do a straight line design following the patchwork blocks. I get a little impatient while quilting and that often results in a few wonky lines and puckers(although I'm not certain puckers come from trying to hurry). This quilt is no exception. but I'm hoping the recipents won't find the mistakes to be  as glaring as I do. If I do say so myself, I did manage to snap an awful purty picture of the quilting in process! 

I went against my new no-fabric-unless-it's-for-backing rule and bought something for  binding. I had nothing in my stash that would work. NOTHING. OK, I did have enough of the off white, but I wanted the binding to stand out a bit. I'm very pleased with how this soft taupey print worked with the other colors. I refuse to speak of the hell that is machine applied binding, but the binding was applied by machine.

It is a noticeable frame for the quilt, but the pink and green patchwork blocks remain the stars of the show. 

So the lighting is horrid in this last shot, but I couldn't wait to photograph it in natural light! Here' the finished product...I'm pretty happy with it!


I'm immediately starting on another baby quilt. I want to take a bit more time with it. I have an idea (thank's to the babe's grandma) and I'm hoping that it will be a hip, funky quilt for a very special little person! Hopefully I'll have pics to post very soon!

Sunday, March 4, 2012

The Bangles

I have a thing for vintage costume jewelry. I have since high school. I used to go to flea markets and yard sales with my mamaw as a teen, and remember picking up bracelets, necklaces and especially brooches. How I loved a gaudy old brooch back then! I still have one of those brooches that Mamaw bought for me. It has a big ugly lion on it and I thought I was totally rad when I pinned it on my denim jacket with the puffy sleeves and turned up collar.

Mark and I have spent many many hours at flea markets and antique malls(he's definately not an early bird, so we don't usually do yardsales) over the past 24 years. I don't know how much vintage jewelry I picked during that time, only to sell it in a yard sale or send it back to a thrift shop. Sigh.

Not too long ago I was blog hopping when I came across this photo:

Photobucket
Photo Source: http://vixenvintage.blogspot.com/2012/01/bangles-and-bras.html
"GAH!" I thought to myself. "Holy Bakelite Batman! That is one fabulous little collection of bangles! I cannot go on living without my own fabulous little collection of bangles!"

And on a sidenote, if you've never visited Vixen Vintage before...Do It!  I discovered the blog through the bangle photo and became instantly enamored. She posts some of the most beautiful photos and amazing vintage goodies that you are likely to see. It's one of my new favorite blogs!

I immediately went to my jewelry box and started digging. I knew still had at least four bangles because I constantly wear the polka dot, black, gray, and red(not pictured) ones. I managed to dig up several more and WooHoo! I do have a small collection!


Yesterday, Mark and I took off for another round of flea marketing and I picked up a few more pieces to add to my collection. 

None of these was over $2.00! Score! I was so happy to pay .50 each for four of these that I didn't notice the red one was broken until I took the photo this morning. Luckily, I have another red one! This one will be used for a craft project...I'm thinking decoupage.


These were a bit more costly...$3.00 each!! Oh how I love getting stuff for cheap! 
I realize there is not a single piece of vintage Bakelite in the bunch. And a girl can't really have a bangle collection without some Bakelite, can she? For now this girl will...because she is a public school system employee. Furthermore, she already has a serious spending problem with fabric and sewing/quilting items.  So, sadly,  no Bakelite for me until I win the lottery.

Here's my current collection, a few are vintage 60's but most are 70's and 80's bangles. I'm cool with both of those decades! I am looking forward to hunting for a wider variety of eras and lots more colors!  I might have hopped on to etsy.com and ordered a few more just this morning. 
using a sock/underwear drawer organizer for storage. A pretty vintage one is on my "to get" list. 
Despite the Bakelite disparity of my collection, the bangles make me happy! 


For even more Vintage Thingies fun, head on over to The Coloradolady


Saturday, March 3, 2012

Cookie Bliss

Sugar Cookies. Mmmmm.  I love them...they are, without a doubt, my favorite form of cookie. I love a good warm chocolate chip cookie and a nice crunchy peanut butter cookie, don't get me wrong. But a simple sugar cookie with icing is what my heart truly desires when it comes to cookie goodness.

I must admit, I am sucker for the thinner, rolled version with glazed icing. A local bakery makes the most fantastic version...I try to stay away from the place, but when a box of Golden Glaze cookies shows up in the teacher's lounge, I cannot resist and admit to eating more than my fair share. 

These cookies are nothing like those glazed cookies , but they are just as delicious! I found the recipe at The University of Cookie--where they do some incredible things sugar cookies and have video tutorials so the rest of us can do incredible things with sugar cookies too! This recipe is not for fancy glazed and decorated cookies, however.

This is a thicker, softer cookie with fluffy icing. And y'all.., It. Is. Heavenly. Think Lofthouse, only better. Much better. They're soft--just enough. The icing is out of this world and the perfect amount of "sweet" to compliment the cakey cookie. I wish I had one right now!

I will warn you against eat them first thing out of the oven, though. Give them plenty of time to cool and let the icing "set" a bit before digging into them. Trust me on this. You won't be sorry...the wait is worthwhile.

I took some to my quilt meeting the other night and some to school to share with my coworkers. Rave reviews. One person even said they were the best sugar cookies she'd eaten in her entire life! 

They did take a bit of time to ice, but compared to cut out cookies, they were a breeze to make! I didn't change a thing from the original recipe, so if you want to make these, head to University of Cookie, grab the recipe and have yourself some cookie bliss.


Tuesday, February 28, 2012

Excess --OR-- Online Shopping, Thou Art Satan

I was terribly excited to receive the following books this week:


Once they arrived, I spent about an hour leafing through them, reading bits and pieces and perusing the photos.

And then I thought to myself, "Did I really just buy books about how to date fabric?  Fabric Dating? REALLY?" Good Grief.

I don't collect feedsacks or vintage fabrics, I certainly can't afford to collect vintage quilts. Honestly, I don't know what came over me other than a whim to pick these up. I'm working on a 30's repro quilt, but I can buy those prints at my local quilt shop. I've since rationalized that they might come in handy to my husband's antique mall booth---he may pick up some vintage quilts that need dating at some point. And actually, the Making History book is quite a fascinating read and does include several projects, so I don't feel as bad about buying that one. Who knows, perhaps the other two will prove invaluable some day.

As I was putting the books away, I realized that I am completely overrun with quilting, sewing, and craft project books. To the point that it's ridiculous. If I live a hundred years, I'll never complete all those projects. The thought of the money that's gone into those dust collectors is sad.

So I've made a decision.

I will not buy another project book. Not one. Until I finish a minimum of at least five different projects from five different books. And those that I don't use and don't think I ever will use...I'm going to donate to my local library. Goodness knows they don't have an abundance of craft books. I could furnish the entire 646 section!

And then there's fabric. Don't even get me started!! All I'll say right now is that it looks like JoAnn Fabrics threw up in my sewing room. Here's the decision on fabric for now...

 No more QUILTING fabric(unless it is for backings). If I can't use what I have to make a quilt, I just won't make one!

I feel pretty confident I can stick to both of these new rules. I'm gonna try to stay away from Amazon.com, Etsy.com and the like for as long as possible!

Monday, January 16, 2012

Weight Watchers, It Works and Now I've Got to Work It!

I joined Weight Watchers for the umpteenth time back in August. It's the only thing I've ever found that I can do and consistently lose weight.

I'm losing much more slowly this time around, but I've been OK with the slow loss. Slow loss is better than NO loss, right?

The thing is, I haven't worked the plan wholeheartedly.  I do GREAT for a couple weeks, but I have been known to slack off for weeks at a time.  Still, I'm mostly satisfied with my progress.

And even though 15 pounds(which is where I'm hovering right now) doesn't sound like much, when I compare the photo from my last post(which was taken yesterday) to the photo from the week I started WW, I can see a difference.


Now some of it may be the hideousness of the before outfit, or the angle of the camera, but I do see a difference, and I really hadn't until I compared these two photos.

Seeing the difference in myself has given me a boost! I'm resolved to stay on plan and work the plan in a healthier way!  Yes, on WW you really can drink regular cokes and eat the occasional candy bar and still lose weight, BUT, that's not using the plan to it's full advantage! I'm going to pay more attention to my daily points, be smarter about the plan by taking advantage of those 0 point fruits & veggies, and make it a priority to get some regular exercise.

 I've seen that I can be successful and lose weight by going about it halfway, so I'm pretty excited to see what I accomplish when I give it my all!


Sunday, January 15, 2012

I fall for Simplicity's "It's SO Easy" lie yet again.

In my last post I talked about how I was determined to make my own clothes this year...at least a few pieces. I was pretty excited about it and very much looking forward to getting started.

In fact...here's my first finished dress! Not bad, eh?
My bangs have a mind of their own...tonight they're saying "I'm going to look ridiculous!"
Now, before y'all get too impressed you should know this is a complete farce of a photo! It's amazing what a strategically placed belt, a giant hair clip(for hiding excess fabric) and my magic cowboy boots* can do! But at least in this photo it appears that I can make a dress!


Here's the reality of it...


What I made was a saggy, baggy, tent of a dress. The picture doesn't really do justice to how giant the skirt part is nor how ill fitting and wonky the top is. But it's bad, y'all. I actually put it on this morning thinking I'd wear it to the grocery. My husband said it looked like I was wearing a bell! So I grabbed my go-to for fixing wonky outfits, a denim jacket. It actually looked worse. Way worse. Especially from the side veiw.

I spent hours on it. HOURS. So much for Simplicity and that "It's SO Easy" bull printed on the pattern pack. I don't know how many times I have fallen for that one, but it's  never been "SO Easy"!  This time was no exception.

Although, as I was going along, I was feeling pretty confident! I got the skirt put together. I totally rocked the bodice. It's putting the two together where things went south.

And I know (now) what I did wrong.

I cut the bodice a size smaller than the skirt.  D'OH!  In my defense, I was using my measurements and following the pattern pack guidelines.  The bodice was supposed to be slightly gathered before sewing to the skirt. Since it was a size smaller, it didn't end up fitting the gargantuan sized skirt (which was cut to what I thought was my size). So I fiddled, un-gathered, and generally messed with the two pieces trying to get them to fit together until I got to that "I'm just going to sew the thing" point.

And then came the super fun job of trying to sew an elastic casing through all those layers and puckers and aforementioned mess.  Followed by even more fun...trying to thread the elastic through casing that way to small in more than one place. Super super fun.


If any of you notice a peculiar cloud floating by, pay no attention, it's probably just the remnants of the cussin' fit that accompanied the whole elastic casing/threading elastic business.

Despite my resulting tent dress, there were some good things that came out of this little adventure:
  • It was a good learning experience. I know what size to cut the next time and I will cut the top and bottom the same size. I think that might solve some of the trouble I had with the casing issue as well as the fit problems.  
  • It didn't end up in an angry heap forever banished to a ziplock bag in my closet. I finished it! I might even go back and work on it some more. Months from now.
  • I  actually made a dress. It was my first try, and even though I can't wear it, it is clearly a dress. I'd call that a success! 
My next sewing adventure will consist only of things I know I can sew successfully, like aprons, bags and quilt blocks. But I'm not ready to give up on making clothes just yet. I'm just not ready to try it again anytime soon!


*my cowboy boots aren't really magic

Sunday, January 8, 2012

And She Will Make Clothes in 2012!

Despite the fact that I've already got big plans to do a boat load more quilting and sewing this year, I rediscovered a website this morning that has me chomping at the bits to add more to my to-do list.

The Sew Weekly. I stumbled upon it through pinterest a while ago and pinned a couple of "Make this Look" posts. These posts show an inspiration piece from Modcloth or Anthropologie and a very similiar sewing pattern and fabrics, allowing you to create your own version of the originial. Brilliant!

This morning I spent at least an hour looking through the "Make this Look" section and scouring over gorgeous and fun vintage inspired outfits that users had made. 

Like this dress, which I am currently coveting.


I'm certain there are a ton more goodies on the site.  Which means I'll have to spend even more time there. Oh, bother. 

Still, that hour I spent at looking at the creations of others, has totally inspired me to drag out some sewing patterns and get busy!

I'll mention that sewing clothes is not what I'm most comfortable with. A simple handbag? Doable. An apron. No problem! A skirt? I've made exactly two. This one. and This one. I've got two more wadded into heaps in ziplock bags and thrown into the back of my sewing closet, perhaps never to see the light of day again. I've started two blouses...one is in much the same shape as the two skirts mentioned above and the other was so bad that I just threw it away, pattern, pins, and all.  I've yet to tackle a dress.  Zippers and the mention of piping make me break out in hives.  Pants? Just plain scary.

Still, despite my past experiences with garments, I am inspired to try again! 

Between all the other creative things that I want to do and the fact that I have to go to work on a daily basis, I will somehow make time to myself some clothes. Clothes that (1). I can wear in public and (2). Won't end up in a sad heap confined to a ziplock bag.

The only thing I'm lacking are cute vintage patterns in my size and enough yardage to make clothes. I buy in FQ, Half and One Yard cuts...because that's what works for me w/quilting and the things I normally make. But that's an easy fix! I'm going to start thinking "more" when it comes to yardage!

The vintage patterns are probably going to be above my current level of skills, so I'm content with pulling out some A line skirts and the two simple dress patterns that I own. Once I master those, I'm totally moving up to the vintage inspired stuff and I will be making one of those Modcloth inspired dresses...like this one. 


Now, I'm officially requesting that more hours be added to the day.