Thursday, June 23, 2011

Wonky Log Cabin Tutorial

I was recently asked to do a demo of how I made the wonky log cabin blocks in this quilt top at my quilt club's summer retreat. Knowing I'd be a nervous wreck(these ladies are Real Quilters), I decided it might not be a bad idea to have something concrete to back up my rambling demonstration. I photographed my process and typed up some directions. I thought I'd share it with y'all as well.


I didn't invent the wonky log cabin(also called liberated log cabin or improvisational log cabin), but I do love to make them!  There are several other tutorials out there...this is my method. I make them at 6.5 or 9.5 inches because those are sizes of my square rulers.

What you'll Need:
  • A pile of strippy scraps, at least one of the long edges should be trimmed nice and straight. Nearly any width will do. These will be your logs.
  • A pile of 2"-4" fussy cut squares for the center. 
  • rotary cutter
  • 6.5" ruler
What You'll Do:

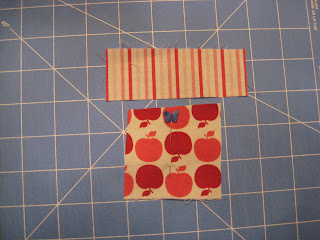
Choose one of your square(ish) shapes and a scrap of fabric for the first "log).


The pin is there to help remind me how the block is oriented
Lay the log down on your square in a "wonky" manner and sew using a 1/4 inch seam along the outer edge of the log. It might feel weird and uncomfortable to not have your edges lined up. Do it anyway!


Trim away that ugly edge.
You're left with something like this.
Trim the edges.
Repeat this process to continue building your block.


It's OK if some of the edges are non-wonky!
If you feel your block is getting a bit out of control, you can trim it up after the first round of logs is complete.


Repeat the process until you have a block that is a bit larger than 6.5". Depending on the width of your logs,  your block may have two or three rounds of logs.
When completely finished, you'll have something that looks like this.
Use your 6.5" square ruler to trim up the block. If you have enough "extra" fabric, you can wonky it up even more!
OK, at this point, I should note that I my camera batteries ran down and I don't have the finished block to show you. But I CAN show you a photo of the finished block...I made several of these blocks for a fun table runner!

That's it! Hope you enjoyed and if you make any wonky log cabins using this method, I'd love to see them!

Monday, June 13, 2011

Apple Crumble for Folks Who Don't Like Cooked Apples

I don't like cooked apples.

Or so I thought.

And then I watched Melissa D'Arabian on The Food Network make an apple crumble.

An Apple Crumble with Cardamom-Vanilla Caramel Sauce, to be exact.

And I thought to myself, "How have I lived 39(not really) years without having eaten an Apple Crumble with Cardamom-Vanilla Caramel Sauce? Truly, I haven't lived!" Then I changed the channel and got mesmerized by something else, probably Billy the Exterminator or reruns of Three's Company.

A few weeks later I was in the grocery store and remembered that I wanted to make that apple thingie with the fancy sauce. I had no idea what ingredients I'd need other than the apples. SO, I picked up some Granny Smith's, came home, hunted down the recipe, and realized I could make the apple crumble but not the Vanilla-Cardamom Caramel Sauce. Honestly, I reasoned, if it takes four words to describe the sauce, it's probably over my skill level anyway. I settled on making the Apple Crumble alone.

Since I wasn't making the Fancypants Sauce version, I decided to check out other recipes for apple crumble before I got started. What I ended up baking was a conglomeration of Melissa D'Arabian's recipe and one I found on Joy the Baker, and...

Oh. My. Gosh.

I felt the need to apologize to all those cooked apples I'd turned my nose up at in the past!

Apple Crumble for Folks Who Don't Think They Like Cooked Apples


What You Need:
For Filling:
5-6 medium Gala apples (or a mix of Galas + Granny Smith), peeled, cored & sliced
1Tsp. lemon juice
2.5 Tbs. sugar
1.5 Tsp. cinnamon
pinch of salt

For Crumble:
2/3 cups all purpose flour
2/3 cups brown sugar
2/3 cups oats
1/3 cup finely chopped pecans
pinch of salt
one stick of butter I use light margarine since my husband is vegan, but in my heart, I know butter makes it better.

What You Do:
Preheat oven to 350 degrees.

Toss apple slices with lemon juice, sugar, cinnamon and salt and set aside.

In a separate bowl mix crumble ingredients until uniform.

Melt butter in baking pan. Pour melted butter into crumble mixture, leave the excess butter in baking dish to coat pan. Arrange apples in dish and cover with the crumble mixture. This crumble mixture will be dough-y(expert culinary term)sometimes I try to pat it out and lay it on the apples, other times I plop globs of it over the apples, covering as much of the filling as possible, either works.


Bake till apples are cooked through and topping is nice and brown. 45min. to an hour.


Serve this warm and top  with some Vanilla ice cream, and if you're more adventurous than I, make yourself a fancy Vanilla Cardamom Caramel Sauce to go with it. Don't forget to come back here to tell me what you think!

And for those of you just joining me, I'm giving away a few fabric postcards. Check my previous post for details on how to get one.

Sunday, June 12, 2011

Postcard Swap with Vintage Sheets & Aprons

A while ago I joined the Trading Fabric Postcards group. I've received some fun and artsy postcards and been able to play with new ideas as I learn to make these little works of art. In May, one of the themes was Aprons. I couldn't resist joining in. I decided to use some of the scraps left over from the vintage sheet quilt I've yet to finish to make the card. I wanted it to have a shabby/cottage look, so instead of doing a tight zig zag around the apron, I did a straight stitch, leaving enough edge exposed to ravel. The outcome isn't exactly what I had pictured, but I am pleased with the overall look of it and I think the pieces of vintage sheets are lovely. 
I'd like to make more postcards using sheet scraps and I'd like to share them with YOU! If you'd like a vintage sheet postcard, leave a comment here.  I'll choose several names from a hat in a couple weeks and sometime in the next month in the next year in the future, those folks will receive a little bit of vintage sheet love in their mailbox!

I adore the postcard that Chris sent to me in this swap! The background is a vintage quilt block from her granny's stash and the apron is made from Plaid stamps! I'm assuming these are some type of saver stamp that came from a grocery store. It's perfect! 

Friday, June 10, 2011

Best Oven Fried Chicken (no, really!)

Fried Chicken. Sigh. I direct you to my first(and only) slightly sad attempt at frying chicken. I almost got it right, and probably could have eventually gotten a handle on it if I'd kept at it, but I gave up.  I know.  I should be ashamed. I'm Southern after all, and from Kentucky...the Fried Chicken Capitol of the World! But me and fried chicken, we just don't jive. 

So here I am, four and half years after starting what I thought would be a cooking blog and I still can't fry up a chicken and I'm still not much of a cook either. This may explain why my cooking blog has morphed into a random craft/sewing/apron/quilting/ blog where I occasionally share a recipe. 

Which leads me back to the chicken...

I found a recipe for oven "fried" chicken that was a snap to make and tasted great! This recipe comes from the book Eat What You Love by Marlene Koch.

Best Oven Fried Chicken
What you'll need
  • large egg whites
  • 1/2 teaspoon garlic powder
  • 1/2 teaspoon onion powder
  • 1/4 teaspoon cayenne pepper
  • 1/2 teaspoon ground sage
  • 1/4 teaspoon dried thyme
  • 1 1/4 cups corn flakes
  • 1/4 cup plain breadcrumbs
  • 1/2 teaspoon black pepper
  • 1/2 teaspoon salt
  • tablespoons all-purpose flour
  • 1 1/2 lbs skinless chicken
***My changes due to lack of ingrediets: 1/2 cup egg beaters subbed for egg whites; paprika subbed for cayenne; Italian seasoning subbed for sage & thyme; I used precut chicken breast tenders.

What You'll Do
  1. Preheat oven to 400. Place a wire rack on top of a baking sheet and spray with cooking spray.
  2. In a shallow bowl, whisk together egg whites with  garlic powder, onion powder, caynne pepper, sage and thyme.
  3. Place the cereal in a plastic bag and crush thoroughly with a rolling pin. Place in a shallow bowl and mix with  breadcrumbs, pepper, and salt.
  4. Place flour in a third shallow bowl.
  5. To bread the chicken pieces, first dredge the chicken in th flour to coat. Next, dip each piece of chicken into the egg white mixture, followed by the crumb mixture, making sure to cover all surfaces. repeat until all the chicken is coated.
  6. Place the chicken pieces on the prepared rack and bake for 45 minutes, or until the chicken is  golden brown and reaches 180 degrees.
I'll admit to being a bit skeptical of any recipe titled "BEST" anything, but this was good stuff, y'all!  The chicken was juicy inside and crispy outside--just the way I like it! It was truly the best oven fried chicken I've tried....and I'd bet that cooking it on the wire racks is what made the difference. Give it a try and tell me what you think!  And I'd recommend you pick up a copy of this cookbook, especially if you're a cooking novice like I am. It has lots of familiar recipes(without exotic, hard to find ingrediets), made healthier.

Tuesday, June 7, 2011

Oh, Sheet!

So, perhaps it was a good idea that I covered my design wall in UFOs. In just two nights I've managed to make some progress on one of those projects!


This is going to be a picnic quilt, which means picnics will be had this summer. It will also be the quilt I leave in the car for random things need covering and Mark is freezing me to death type emergencies.

Made from vintage sheets, it started out as plain four patches but has evolved into a more liberated style.  I love the movement that comes from recutting the original four patch blocks!

Once I get all these four patches sewn together my plan is to do a thin border of a solid(if I can find something in my stash) and a wider outer border using the yellow daisy sheet.

Hooray for progress!

Sunday, June 5, 2011

UFO Sightings

Now that Summer has finally arrived and I get a few weeks off work, I have big sewing plans! To keep myself motivated and inspired to finish at least one of them, I've filled my design wall with bits and pieces of my current UFOs.

UFO's pictured:
  • Picnic Quilt made from vintage sheets.
  • A 30's Sampler
  • Grey zig zag quilt.
  • Moda Sweet  Quilt---pictured above the yellow pinwheel star block. It came in a kit and is WAY over my skill level.
  • Pinwheel Sampler(this is a BOTM quilt, so no hurry, I just love looking at these bright blocks).
  • Wonky log cabin quilt(yes, another one).
Other UFOs and crafty endeavors I'd like to tackle this summer:
  • Decide how to finish off my Wonky House quilt top.
  • Piece a backing for this quilt, and this one, and this one too.
  • Finish a baby quilt I started three years ago. I couldn't bring myself to finish a simple patchwork baby quilt, Y'all! Sheesh.
  • Make a wall hanging for my mom...we bought the fabric last summer.
  • Update my etsy shop with aprons, bags, and monsters.
  • Enter a quilt in the county fair, hopefully one of the three mentioned above.
  • Make a toy or doll to entier in the county fair.
  • Learn (or begin to learn) to paint with watercolors.
And although it's not crafty, I'd like to get my cooking mojo going and try out some new dishes.

Would love to hear your crafty goals for the summer!

Wednesday, June 1, 2011

I should be sewing...

No, really! I have no less than five projects going, all needing to be completed in the next couple of weeks (if not days). However, as a lifetime resident of the Procrastination Nation, I've decided to do a quick update after months of non-blogging instead of work on the things that need doing! Wouldn't want to disappoint the brothers and sisters of my Nation, now would I?

So, what kind of post would possibly warrant stalling on all those projects I'm behind on? A couple of finishes of course!

I finally finished the Cabin Fever Quilt top! In my last post, I mentioned how I'd totally screwed the thing up and had to cut it apart and start over. Here is the finished top. I dig it. Big Time. I made this one for myself and plan that someday it will be my flake-out-on-the-couch quilt.


I used Tonya Riccuci's Word Play Quilts to guide me through the letters. If you study wonky letters on various examples, they're pretty easy to pick up on your own, but I'd highly recommend the book. Those wonky letters go together much faster when you have Tonya guiding you along! 


My most recent project was a baby quilt for my soon-to-arrive nephew! I was planning to have an I-Spy quilt ready to give my sis at the shower, but, as y'all might have guessed, I didn't start soon enough. Luckily I had a Max & Whiskers charm pack and a white Moda Bella Charm pack in my stash. I played on my design wall until I had a layout that I liked, and went for it. I waiting so long that I was even forced to do my own free motion quilting! Despite the machine applied binding, I love how this quilt turned out. Even more, I love that my  sis loved it and she fully intends to let the baby drag it around, chew, and 'waller' on it!

Note to you receivers-of-quilts-as-gifts... your quilt gifting friend would LOVE it if you would put your quilt to good use(whatever that might be) instead of  storing or putting  it away because it's "too pretty to use".  Just sayin'!
Next time, perhaps I'll show off the projects I slacked on tonight!